![]()

Antique Delft tile installation – complete guide to processing, substrate, laying pattern, thickness differences and grouting
Summary
Installing antique Delft tiles requires a careful and thoughtful approach. Due to variations in size, thickness and material, it is important to work with lime mortar, carefully prepare the substrate and accurately determine the laying pattern in advance. In this comprehensive guide, we describe how antique tiles are handled, focusing on preparation, placement, accommodating size and thickness variations and applying appropriate grouting. The result is a durable tile surface with a calm, authentic appearance that does justice to the history of the material.
Why antique Delft tiles require their own approach
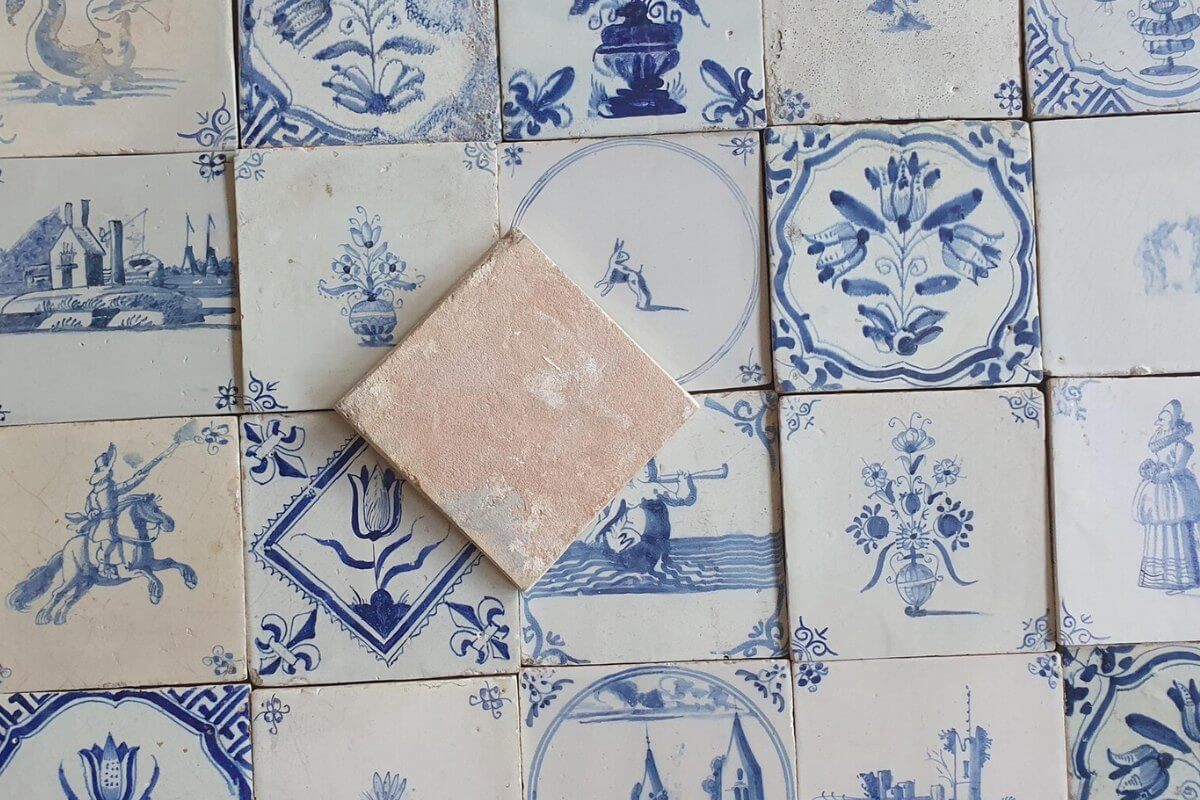
Antique Delft tiles are the product of craftsmanship. In the 17th and 18th centuries, they were shaped, fired and painted by hand. That process causes each tile to show subtle differences in size, thickness and surface. It is precisely these small variations that give the material its lively character and make it so attractive in contemporary interiors.
When you look at a wall of antique tiles, you see not only a decorative surface, but also a story. The representations, from ships and landscapes to flowers and biblical scenes, reflect the world of trade, art and daily life of the Golden Age. The relationship to overseas trade and the influence of the Dutch East India Company are clearly visible in them. Motifs from the heyday of tulip culture have also left their mark in tile decorations.
For those who wish to delve further into this background, our other blogs also connect nicely with it, such as The History of Delft Tiles, VOC and Delft Tiles and Tulip Mania and Delft Tiles. This historical context makes it clear why the processing of antique tiles requires its own approach. It is not just about applying a wall covering, but also about carefully continuing a tradition.
The substrate as the foundation of the whole
A good tile surface begins with a substrate that supports the material without overpowering it. Antique tiles function best on a stable and breathable base. Traditional substrates such as lime plaster and masonry naturally fit this well. They have similar properties and, together with the tiles, form a cohesive system.
Suitable substrates can also be created in more contemporary situations. Cementitious substrates can work well when carefully prepared and maintain their open character. Gypsum can also be used, provided it is stable and properly treated. Practical experience shows that a carefully constructed substrate is not only more pleasant to work on, but also provides peace of mind during installation and contributes to a durable end result.
The preparation of the substrate thus forms the basis on which the further process develops. The better that base is, the easier it becomes to properly accommodate small differences in size and thickness during installation.
Preparing the substrate – creating the right balance
The wall is prepared to a clean and slightly absorbent surface. This means that dust, loose particles and disturbing irregularities are removed so that the mortar can adhere evenly. In this process, a wall does not have to be completely perfectly flat, but it must be built up in a stable and calm manner.
A simple way to assess the substrate is to wet it lightly. The water should gradually soak into the wall. This indicates that the suction is balanced and that the mortar can adhere well without drying out too quickly. When a wall is too dry, it draws moisture from the mortar too quickly. With a simple check beforehand, you avoid suffering from this later during installation.
With gypsum, it helps to further refine this balance. Light wetting or applying a mineral primer creates a surface that works well with lime mortar. Materials such as silicate or lime-casein blend nicely with this and provide a natural transition between substrate and mortar.
Any unevenness is corrected with lime plaster or lime mortar so that the surface becomes suitable for placing the tiles. In this way, a calm and balanced base is created on which the tiled area can be logically constructed.
Preparing the laying pattern – the beginning of the final image
Before placing the first tile, it is wise to first lay out the entire tile area dry. This is one of the most important steps of the entire process. It is precisely here that you can see how the tiles relate to each other and how the final image will be constructed.
By laying the tiles side by side, differences in size, thickness and color become immediately apparent. This makes it possible to make a conscious division. With antique tiles, it is normal for them to differ from each other by a few millimeters. By seeing that in advance, you can take that into account during installation instead of having to correct it later.
It helps to sort the tiles roughly by thickness during this preparation. This doesn’t have to be exact, but it gives an immediate overview. You can see which tiles are thinner and which are thicker. During installation you can then make up the difference with the mortar. Also, at this stage you can already see which tiles look good next to each other in terms of presentation, shade or appearance.
For tiles with a scene, you determine the order at this stage. For individual tiles without a continuous scene, you divide them in such a way that the whole remains balanced and no striking discrepancies are juxtaposed. The goal is for the eye to naturally move across the surface later without one corner looking more unsettled than the others.
The position on the wall also plays a role. In many cases it works well to start from the center of a wall, fireplace or mantelpiece. This prevents the work from ending in a narrow or visually unsettled strip on one side. Choosing a logical starting line in advance makes the whole thing more balanced.
When laying out the pattern, it is also important to already consider the grout. Antique tiles do not lie tightly together. A small joint ensures that size differences are taken care of and that the lines continue nicely. So the grout is not just a finishing touch afterwards, but plays a role in the construction of the whole from the beginning.
By doing this preparation carefully, you will work faster and more calmly later, and you will need to make fewer corrections during installation. This makes the whole process clearer and contributes visibly to the final result.
Lime mortar as a connecting material
Lime mortar forms the core of the system where substrate and tile come together. The material has an open structure and slight flexibility, making it well suited to the properties of antique tiles. Precisely because antique tiles differ from one another, a mortar is needed that can be distributed and corrected.
A traditional composition consists of one part lime and two to three parts fine sand. This ratio provides a balanced application where the mortar is easy to apply and adjust. While working, lime mortar gives peace of mind because you can build up tile by tile without rushing.
The mortar is applied to the wall, then the tile is placed in it. This way, you keep control over the thickness of the bed and can easily make adjustments. This makes lime mortar not only appropriate from a historical point of view, but also practical to use.
Thickness differences – this is how to easily eliminate them
Variations in thickness are characteristic of antique tiles. That doesn’t mean they are difficult to work with, but it does mean you have to look at what is needed on a tile-by-tile basis. Instead of completely eliminating these differences beforehand, resolve them during installation.
Apply lime mortar to the wall and place the tile in it. If you see that a tile is thinner, use a little more mortar. If a tile is thicker, use a little less. By working slowly and moving the tile slightly, the mortar will distribute itself and the tile will be at the correct height.
This way of working is clear and easy to learn. You don’t have to use a complicated method; you simply look per tile to see what is needed. This way you build up the tile surface step by step, without tension and without forcing.
The result is a wall that looks visually calm, yet retains the slight vibrancy so characteristic of historic tile work.
Backfilling – extra help for larger differences
For larger differences in thickness, it may make sense to pre-treat the back of a tile. Applying a thin layer of lime mortar and smoothing it down flat creates a more even starting point for installation.
In practice, this is a simple and useful technique. If you notice that a tile is noticeably thinner than the surrounding tiles, you can fill the backing slightly in advance. Let this layer set for a while and then place the tile as usual. This will make working on the wall itself more manageable and the tile will fit more nicely later on.
Because the same mortar is used as on the wall, the system remains consistent. This works pleasantly and ensures a quiet and stable construction.
Placing the tiles – rhythm and construction
Installation of the tiles is done step by step. The lime mortar is applied to the wall, then the tile is placed and moved slightly to obtain a good connection. Then the position is gently corrected.
During this process, the lines of the whole emerge. For this very reason, it is nice to work in smaller planes or rows and regularly check how the pattern develops. Small adjustments during placement ensure that the whole gradually forms into a coherent surface.
The combination of size differences, joint width and placement creates a natural look in which each tile finds its place. So you’re not working toward a completely clean, mechanical surface, but rather a wall that looks balanced and calm while retaining the character of the handmade material.
Grouting and coloring – the connecting layer
Grouting forms the transition between tiles and brings the whole together. The choice of material and color directly affects the appearance of the surface. A well-chosen grout supports the tile surface and makes the wall read as one.
Lime joints or soft lime-cement joints match the properties of antique tiles and provide a balanced structure. They are easy to work with and form a beautiful connection between tile and substrate.
The grout also plays an important role in color use. Soft tones such as light gray, sand color and off-white often give the best results. These colors enhance the character of the tiles and bring calmness to the surface without losing the decoration.
The grout width also plays an active role here. Because antique tiles are not exactly the same, you can vary the grout width slightly. This accommodates size differences and keeps lines optically calm. The grout is thus not only a finish, but also a practical tool for installation.
After application, the grout is neatly finished, slightly recessed or flat, depending on the desired appearance. Excess material is removed immediately with a slightly damp sponge, keeping the tile surface clean and bright.
Drying and curing – completing the process
After installation, the tile work is given time to set. The drying process is gradual and contributes to the stability of the whole. This phase constitutes a quiet completion of the work and ensures that all the parts bond together.
Giving the surface time to harden properly creates a tile surface that not only looks beautiful, but is built to last.
The difference between execution and craftsmanship
A tile wall with antique Delft tiles is characterized by subtlety. Small variations and a natural structure give it its character. That doesn’t mean it has to be elusive or difficult. On the contrary: with good preparation, logical work and attention to size, thickness and grout, you can achieve a convincing result step by step.
The difference is often not in complicated techniques, but in the willingness to look carefully in advance and to build up calmly during the work. That is exactly what makes this way of working practical and expert at the same time.
Interior applications
Antique Delft tiles are used in fireplaces, kitchens, wall panels and paneling. In a kitchen they can serve as a backsplash, while in a fireplace or wall niche they form a quiet and characterful accent. With their timeless appeal, they blend naturally into a variety of interiors, from classic to contemporary.
This makes antique tiles not only interesting from a historical point of view, but also very useful in contemporary applications.
Conclusion
Installing antique Delft tiles requires an approach in which preparation and execution are logically connected. Working with lime mortar, a well-prepared substrate and a well thought-out laying pattern produces a durable and authentic result.
If you explain the tile field well in advance, calmly accommodate size and thickness differences during installation and consciously use the grout as part of the whole, it turns out that this way of working is quite feasible. Above all, it requires an overview, attention and a practical approach.
Antique tiles carry a history within them and come out best when continued with care.